Repository Technical Guide
This is no longer maintained
The Whitebrick No Code DB (Data Repository) comprises a front end Gatsby Jamstack client (whitebrick-client) and back end Serverless application (whitebrick-cloud) that adds multi-tenant DDL and access control functions to a Database via the Hasura GraphQL Server. The Jamstack client uses AG Grid as a spreadsheet-like UI that reads/writes table data directly from/to Hasura over GraphQL. Additional functions including DDL are provided by whitebrick-cloud Serverless functions that are exposed through the Hasura endpoint via schema stitching.
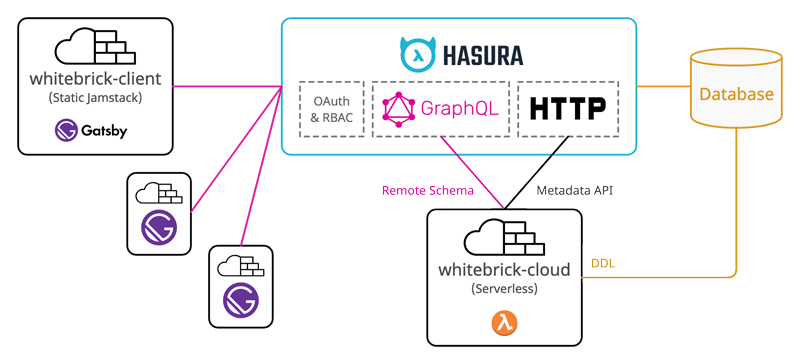
Hasura
Hasura is an Open Source server application that automatically wraps a GraphQL API around a standard relational database.
Database Queries
Whitebrick queries Hasura to display table data and to update table records. When table data is queried, paginated, sorted and updated (mutated) this is processed by Hasura over GraphQL.
Schema Stitching & Remote Joins
Hasura also supports stitching schemas and passing requests on to other external endpoints. When Whitebrick requests DDL functions such as adding a new table or column, Hasura passes this request on to the Whitebrick Cloud Serverless app and then returns the response through the same single GraphQL endpoint.
Metadata API
Hasura provides a separate HTTP API that allows database metadata to be programmatically updated and refreshed. For example, when Whitebrick Cloud executes DDL commands to add a column to a table, it then calls this Hasura API to update the metadata so the new column can be tracked and queried over GraphQL.
Authentication & Authorization
Because Hasura stitches together multiple APIs under the one unified endpoint it is well placed to manage authentication and authorization. Hasura checks for credentials in a JWT issued by a third-party authentication provider.
Whitebrick Cloud
The Whitebrick Cloud back end is a set of functions written in Javascript using the Apollo GraohQL interface and executed on a Serverless provider. Whitebrick Cloud connects with a database to make DDL calls such as creating new tables and columns. After modifying the database Whitebrick Cloud then calls the Hasura Metadata API to track the corresponding columns and tables. Whitebrick Cloud also manages additional metadata, background jobs, user permissions and settings, persisting them in a dedicated schema.
Whitebrick Client
The Whitebrick front end is statically compiled Jamstack client written in Gatsby/React and uses AG Grid as the data grid GUI. Whitebrick sends GraphQL queries and mutations to the Hasura endpoint and displays the returned data. Because the client is statically compiled it can be easily customized by front end developers and deployed to any web site host.
Front End Customization
Getting Started with Shadowing
The Whitebrick front end is packaged as a Gatsby Theme that can be installed from npm. Gatsby Themes are customized using a system called Shadowing that allows individual pages, components and assets to be overridden by conforming to a specific directory structure. The advantage of this is that the Whitebrick client Theme can be maintained and updated independently of your customizations.
The easiest way to get started is to use our Gastby Starter that installs our Gatsby Theme and also includes a simple example of overriding the header and branding.
-
Clone the Whitebrick Starter Repository
git clone git@github.com:whitebrick/gatsby-starter-whitebrick.git -
Install Packages
cd gatsby-starter-whitebrick npm install -
Start Gatsby
npm run developGatsby will start a hot-reloading development environment accessible by default at
http://localhost:8000. -
Customize
Copy or add files to the
gatsby-starter-whitebrick/srcdirectory to make changes by overriding the corresponding Whitebrick Theme files.
Client Development
To run the Whitebrick client independently (rather than as a Theme) simple clone the Whitebrick repository, configure the .env and run Gatsby directly.
-
Clone or Fork the Whitebrick Client Repository
git clone git@github.com:whitebrick/whitebrick-client.git -
Install Packages
cd whitebrick-client npm install -
Configure the Client
The
.env.developmentis provided with default values - see.env.examplefor additional options. -
Start Gatsby
npm run developGatsby will start a hot-reloading development environment accessible by default at
http://localhost:8000.
Back End Architecture
-
Authentication
Authentication must be configued using a third-party authentication provider. Follow this example and use the config templates provided here.
-
DAL
With the bulk of persistence performed through Hasura, the DAL class is used for supplemental system-wide data persistence (tenants, users, roles, etc) and DDL (creating and altering schemas, tables, columns etc). This implementation has been purposely chosen as a lightweight alternative to ORM.
-
HasuraApi
Hasura needs to know about any DDL changes to update the GraphQL schema - for example, when a new table is added it must be tracked. This class is used to call the Hasura Metadat API over HTTP.
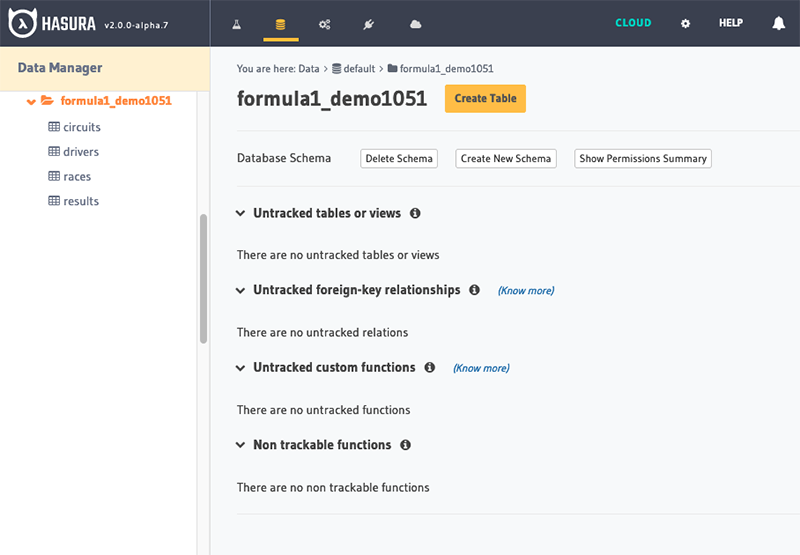
Tracking Tables
The Hasura console displays which tables are tracked vs untracked.
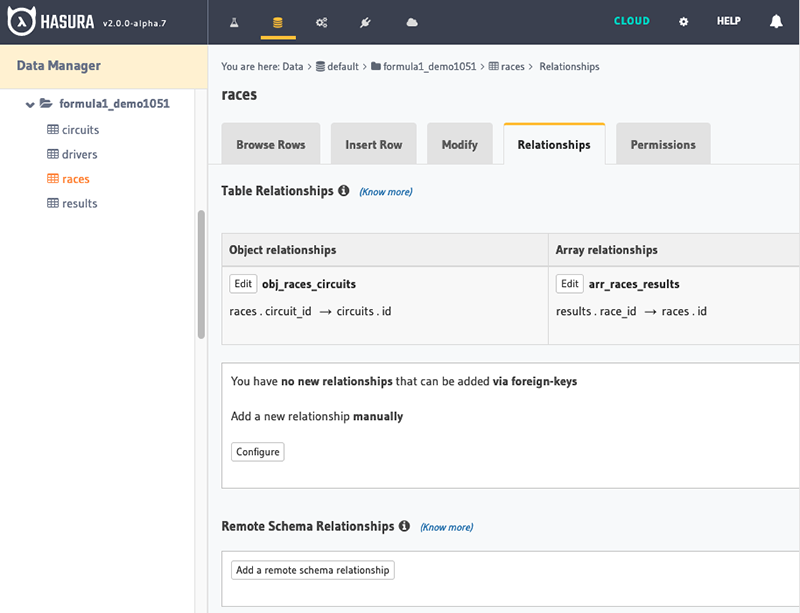
Tracking Relationships
The Hasura console displays which relationships are tracked vs untracked. The naming of the relationship is important for Whitebrick Cloud processing. When foreign keys are created or updated from the Whitebrick front end, the Whitebrick Cloud back end performs the corresponding DDL operation in the database and then calls Hasura to track the relationships.
- A many-to-one relationship is tracked by Hasura as an Object Relationship, for example below, a
racehas onecircuit. - A one-to-many relationship is tracked by Hasura as an Array Relationship, for example below, a
racecan have manyresults.
Relationship Naming objectobj_<Local table name>_<foreign table name>eg.obj_races_circuitsarrayarr_<Local table name>_<foreign table name>eg.arr_races_results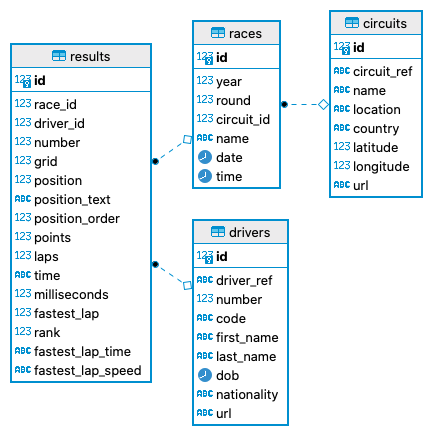
Configuring Permissions
The Hasura console displays the custom checks configured for Table permissions. When Access Control Roles are set from the Whitebrick front end, the Whitebrick Cloud back end records the roles in the
wb.table_permissionstable and and then calls Hasura to configure the permissions. The Hasura custom check takes theX-Hasura-User-Idfrom the session and checks for the corresponding permission in thewb.table_permissionstable.table_permission_keyFormatPermission i<Table ID>(egi123456)INSERT new records into the corresponding Table s<Table ID>(egs123456)SELECT records from the corresponding Table u<Table ID>(egu123456)UPDATE records in the corresponding Table d<Table ID>(egd123456)DELETE records from the corresponding Table 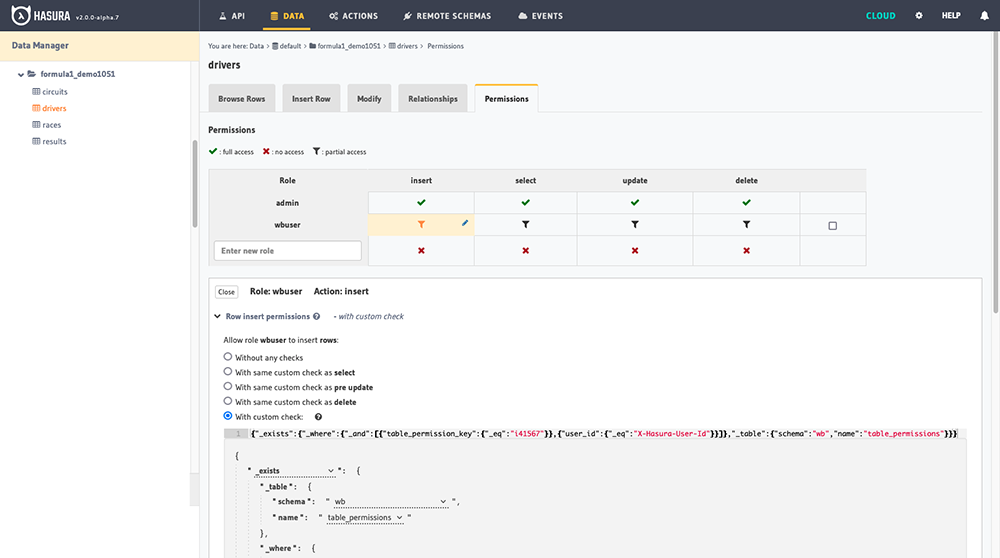
- A many-to-one relationship is tracked by Hasura as an Object Relationship, for example below, a
-
BgQueue
API Gateway has a 30 second timeout so longer processes need to be executed in the background using the lambda invoke
eventtype. -
WhitebrickCloud
This is the top-level API that makes calls to the DAL and HasuraAPI and is called by the GraphQL resolvers.
-
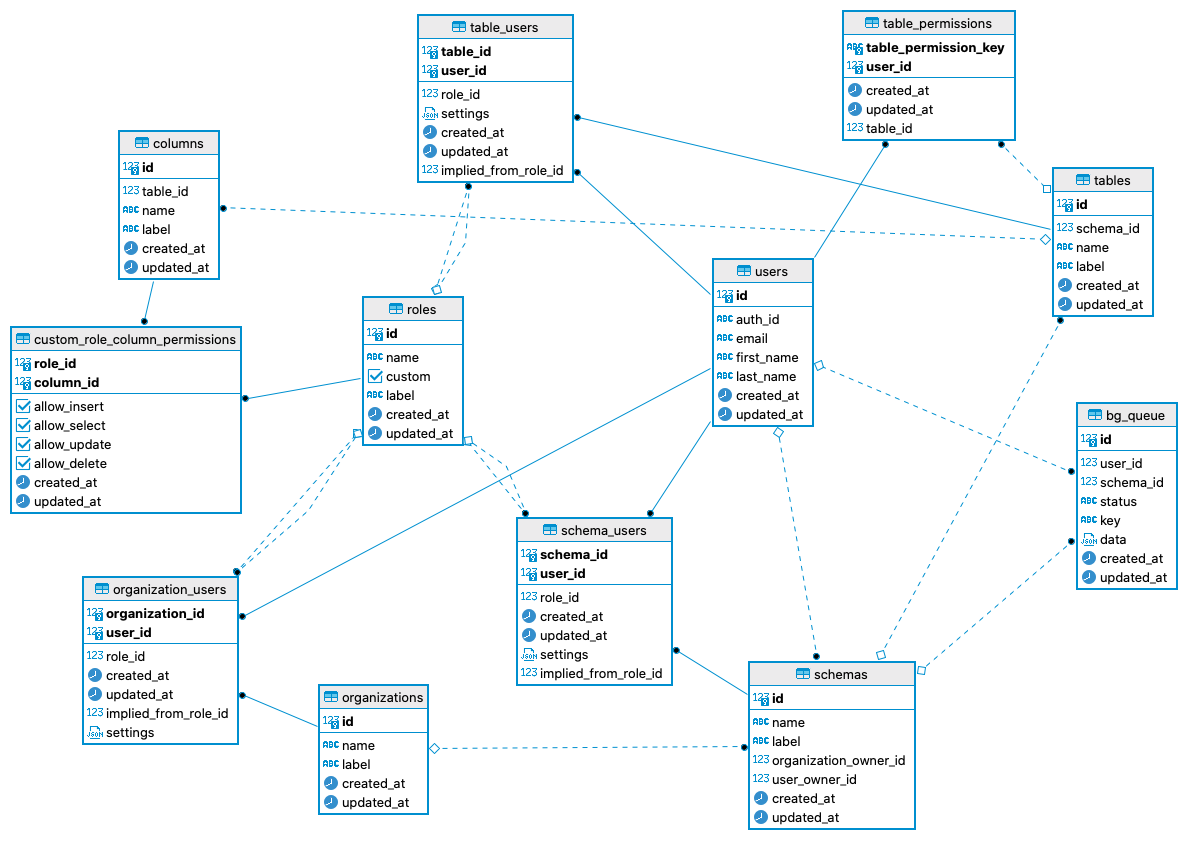
DB Schema
Back End Hosting
Deploying on a Cloud Service
- Refer to Hasura and Serverless documentation
Running Locally
-
Configure Postgres
Create a new database in PostgreSQL and ensure
pgcryptois in the search path (see Hasura requirements)CREATE EXTENSION pgcrypto;Make sure your database can be accessed from psql before proceeding (you may need to enable username/password authentication in pg_hba.conf) ie
$ psql -U <username> -h <host> -p <port> <db name> -
Run Hasura
Add the database credentials and run Hasura from Docker or Kubernetes and be sure to set a
HASURA_GRAPHQL_ADMIN_SECRET. Launching Hasura will create data definitions and values in thehdb_catalogschema of the database. If Hasura does not launch check and debug your DB connection/permissions with psql.Our Docker file looks something like this:
docker run -d -p 8080:8080
    -e HASURA_GRAPHQL_DATABASE_URL=postgres://db_usr:db_pass@host.docker.internal:5432/hasura_db \
    -e HASURA_GRAPHQL_ENABLE_CONSOLE=true \
    -e HASURA_GRAPHQL_DEV_MODE=true \
    -e HASURA_GRAPHQL_ADMIN_SECRET=secret \
    -e HASURA_GRAPHQL_UNAUTHORIZED_ROLE=wbpublic \
    -e HASURA_GRAPHQL_JWT_SECRET='{"type": "RS512", "key": "-----BEGIN CERTIFICATE-----\nXXXXXXXXXX\n-----END CERTIFICATE-----"}' \
    hasura/graphql-engine:latest
Navigate to http://localhost:8080 and check the admin console is running (password is
HASURA_GRAPHQL_ADMIN_SECRETfrom above) -
Install Hasura CLI
Install the Hasura CLI but do not init new config
-
Configure .env File
Copy
./.env.exampleto./.env.developmentand complete with database connection parameters from (1) above. -
Create the wb Schema
Change to the
./hasuradirectory, copyconfig-example.yamltoconfig.yamland complete withHASURA_GRAPHQL_ADMIN_SECRETfrom (2) above. This config is used for the Hasura CLI. Now create the whitebrick-cloud schema "wb" by running$ bash ./scripts/apply_latest_migration.bash. After the migration is complete, change to the./dbdirectory and run$ bash ./scripts/seed.bashto insert the initial data. -
Run Serverless Listener
Run
$ bash scripts/start_dev.bashto start the serverless listener in local/offline mode. By default this listens to http://localhost:3000/graphql -
Set up Authentication
Follow this example and use the config templates provided here.
-
Track wb.table_permissions
From The Hasura console, use the top menu to navigate to the "Data" page, click to expand the default database on the left, then click the "wb" schema. Click the "Track" button next to the "table_permissions" table.
-
Add Remote Schema
From The Hasura console, use the top menu to navigate to the "Remote Schemas" page, click add and enter the endpoint displayed from (6) above, check forward all headers and set and long time-out of 1200 seconds. NB: If you are running Hasura in a local container you will need to use the corresponding URL eg
http://host.docker.internal:3000/graphql. If you now navigate to the "API" page from the top menu, In the query "Explorer" you should see queries beginning withwb*. -
Run Functional Tests
Download Karate (the stand-alone executable is all that is needed). Update
./test/functional/karate-config.jswith your Hasura endpoint URL from (2) above and then with Hasura running, change to the./test/functionaldirectory and run the command$ bash run_tests.bashThis creates a few test users and a small test schema
test_the_daisy_blog. Whitebrick is designed for incremental building-out of databases whereas this testing creates a database all at once so it can take time to run - up to 10 minutes in some cases. If karate lags make sure Hasura and/or it's container has plenty of RAM.To then add additional test data (northwind, chinook and DVD databases) as a second step run
$ bash run_tests.bash importDBs- this can take a additional 15 minutes. Or run$ bash run_tests.bash withImportDBsto run both in one hit.
Access Control
Whitebrick uses a simple Role-based access control (RBAC) model with each Role defining a set of permitted actions configured from the policy.ts file. Currently only a standard default policy is provided but custom policy configuration will be supported soon.
The policy file actions are configured in JSON, for example the block below declares that only a Table Manager or Table Administrator may perform the alter_table action.
alter_table: {
  roleLevel: "table",
  description: "Alter this Table",
  permittedRoles: ["table_manager", "table_administrator"],
}
Role Levels
Every Role has one single corresponding level from the list below. The Role name is prefixed with the role level eg. table_manager
- Organization
- Schema (Database)
- Table
- TBD: Column
Implicit Assignment
- The assignment or removal of a User to a Role can automatically imply additional assignment or removal of Roles. For example, assigning a User the
schema_managerRole implicitly assignstable_managerRoles for all of the tables within the schema. - Explicit assignment always takes precedence over implicit assignment. In the prior example, if the User had already been explicitly assigned the
table_administratorforTableA, then that Role will remain unaffected forTableAand the User will be grantedtable_managerfor all other tables.
organization_administrator
- When assigning the
organization_administratorRole to a User for an Organization, the Roles below are implicitly assigned to the User. -
When demoting a User to
organization_useror removing the User from the Organization, the Roles below are implicitly removed from the User. -
schema_administratorfor all Schemas owned by the corresponding organization- Any existing implicit Roles for the Schemas in are updated
- Any existing explicit Roles for the Schemas in remain unchanged
table_administratorfor all the Tables within the Schema in (1) above- Any existing implicit Roles for the Tables are updated
- Any existing explicit Roles for the Tables remain unchanged
organization_user,organization_external_user
- No implicit assignment for this Role.
schema_owner
- A
schema_owneris an alias forschema_administratorfor the purpose of implicit assignment.
schema_administrator, schema_manager, schema_editor, schema_reader
- When assigning any of the
schema_<role>Roles to a User for an Schema, the Roles below are implicitly assigned to the User. -
When removing the User from the Schema, the Roles below are implicitly removed from the User.
-
table_<role>for all Tables within the Schema- Any existing implicit Roles for the Tables within the Schema are updated
- Any existing explicit Roles for the Tables within the Schema remain unchanged
table_administrator, table_manager, table_editor, table_reader
- No implicit assignment for these Roles.
Data Operations
| Table Role | Select | Insert | Update | Delete |
|---|---|---|---|---|
table_administrator |
[x] | [x] | [x] | [x] |
table_manager |
[x] | [x] | [x] | [x] |
table_editor |
[x] | [x] | [x] | [x] |
table_reader |
[x] | [ ] | [ ] | [ ] |
See Configuring Permissions for an explanation of how Hasura runs checks against User Roles.